Sunday, February 15, 2009

Gun Sound Pack

Militia Defense has been updated with new sounds and some cleaner enemy tracking.
Some friends and I spent an afternoon target shooting and recorded some of the action, so I stripped out the non-essentials and packed it into uncompressed wav's for the masses.
These are released under the Creative Commons Attribution 3.0 Unported License.

Enjoy!

Creative Commons License

Monday, February 9, 2009

Game Programming With Lua

Love sold me on lua as a scripting language and provided a great excuse to learn it. As I get time I intend to keep working on Militia Defense, but I'm at a point now where I need to make some significant changes and there just hasn't been time.

Presently, what time I have has been occupied with some reading and a little work on lua-driven 3D library. I'm using SDL with Bob Pendleton's fastevents and net2. My older openGL framework used GLFW. GLFW is actually really nice, but for this project I wanted to use fastevents and net2 for network access, so it's SDL. Honestly it's just a little trickier to load textures, but beyond that they're pretty equivalent. GLFW has a higher precision timer on the platforms I use, but the perceptual difference between 3k fps and 1k fps is probably negligible, and neither one of the libraries require you to use their timer.
Right now I initialize everything and load up a lua script file that sets the video mode and has functions for the main loop.
I've started using lua's userdata element to create procedural shapes and draw them in 3D. I need to work out matrix transformations and camera functions, but none of this should be particularly daunting. At this point I figure it would be best to implement the scene graph in lua, as well as the camera, but my main concern is texturing and defining static and dynamic mesh formats.
I'm using display lists for static geometry for the somewhat marginal performance increase over VBO's, but I'll be using vertex buffer objects for anything animated. Blender will be the content generator of choice, of course.

Once I start getting tired of this I'll probably go back and re-work Militia Defense. Changing projects form time to time helps me avoid burnout and I can usually come back to old work with new perspective, so rest assured there will be updates to this.

Saturday, January 17, 2009

Trying to Blog Again

It's been around a year since I last posted anything and I thought I might try to actually do something here for a change.

I've been hobbying around with a lot of 3d programming but lately I've started messing around with Love, which is a nice cross-platform 3d accelerated 2d engine that uses lua.
Content creation for 3d games can be a long, difficult process, especially for the lone game programmer. To that end, I've made a few simple 2d games if for no other reason than to say that I've made a couple of complete games.
First you'll need Love, which is a fairly small download.
http://www.love2d.org

With that installed, you can get the game files here:

My simple lander game
http://tyranny.ckt.net/land.love
http://architect.ckt.net/eq/land.love

Militia Defense game
http://tyranny.ckt.net/md.love
http://architect.ckt.net/eq/md.love

In Windows you should automatically have love associated with .love files if you ran the installer. In Linux, just run 'love land.love' or 'love md.love'. Alternatively, your preferred desktop probably has a mechanism for associating love files the the love binary. In gnome it's as easy as going to the 'Open With' tab on the file properties, adding the love command, then selecting it as default.

The .love files are actually just zips, so source code and resources can be found by unzipping them. Both games are released under the MIT license so feel free to play around in the source, but be warned, it might be nasty.
The lua backend makes it so easy to make games that I tend to just plow through them without much thought. The good side of this is, you can use your first game prototype as a design document and you really haven't lost any time.

Monday, February 11, 2008

Blender Modeling: Colt 1911

I spent a great deal of time in Blender today. Usually when I try to model something the hardest part is figuring out precisely what to model. I tend to focus on inorganic things, objects with hard edges and straight lines.
Why a Colt 1911 you ask? It's inorganic and it's a gun.

I learned a while back from some obscure tutorial that background images in Blender are a huge help when getting started. If you have a digital camera you can get your background images just by taking pictures of the front, side, and top of the object you wish to model. Since I don't actually own one of these pistols, I just did an image search and found a nice side shot.

My first step was to make a shape outline. Blender starts up with a cube at origin (0,0,0), which you can either delete or manipulate to your liking. Unless there's a trick for just adding a bare vertex that I don't know about, which is entirely possible, it is necessary to manipulate that cube in some way in order to get started. If you want, you can just select 7 of the 8 vertexes and delete them, then move the one that's left to a desired starting position and use the Extrude command (usually E).
The outline is easy but then you have to add appropriate depth. Obviously this is going to be easier on some objects than others, but if I've learned anything form fooling around with Blender it is this: Modeling requires as much patience as it does skill, especially in my case, since I really have no skill. A professional modeler might disagree, but for someone with no artistic talent and a rudimentary understanding of Blender, it's true.
I'm compelled to remark on Blender as a modeling tool. If you've perused my list of Open Source Software links to the right, you've seen it listed. The more I use Blender the more impressed I am with it. It seems like every time I use it I learn something new about it that makes using it significantly easier. Today I learned a great deal about seams and UV mapping techniques.

Anyway, back to modeling. Based on many of the tutorials I've read, symmetrical objects are created one half at a time and then mirrored. You can actually enable a persistent x/y/z mirror which should mirror your actions along a specified axis. This is probably what I should have done, however, I wasn't thinking about it and since it's far from habit, I simply forgot. I determined an acceptable width for the slide and extruded down from that to build the frame. From there I tapered down into the trigger well and the bottom of the barrel. Lastly, I outlined the grip area and gave it a bevel. I work with it in slices. Once I've made one taper, every vertex in that progression should be at a consistent and recurring 'slice' level.

I should also mention that throughout this process, the object did not have any faces defined. If I accidentally made any, usually by extruding an edge, I removed it just so it wouldn't confuse me later. The act of cleaning up after myself in this manner served to educate me on intelligently removing items from a model in Blender. When you press the delete key to delete something, you get a context menu. For the most part it is self-explanatory but I discovered an important distinction today. If you have enough vertexes selected to define at least one face and you press the delete key, you have an option to delete 'Faces', and lower on the list 'Only Faces'. If you choose 'Faces', you'll also remove the vertexes associated with those faces, but if you choose 'Only Faces', it does what you'd expect the first option to do and just removes the face definitions without removing the vertexes involved.

Once I got all my faces assigned I selected the whole thing and duplicated and mirrored it. This part is where I got into some work that I probably could have avoided. I moved the mirrored half very close to the original, but snapping vertexes has to be done one by one.
Once this was done I removed any duplicate vertexes and fixed any broken faces. Lastly, it's important to make sure your normals are pointing in the correct direction.

After messing with smart unwraps and seamed unwraps in the UV editor, I finally started experimenting and found the option to get UV's from the current projection. Cycling through the different views and manually selecting faces for the UV map strikes me as the fastest way to get it done at this point. That may change as my experience increases.
It was at this time that I ran into my most significant hurdle. I can't draw, paint, or otherwise compose images that are pleasing to the eye.
I was in a hurry at this point so I used a real photo to build the texture beforehand and then manipulated my UV pattern to fit on top of it. This actually proved to be very effective, however, in the future I'll take reference photos as suggested above and recycle those as textures.
This is getting wordy so here's a shot of the finished product.
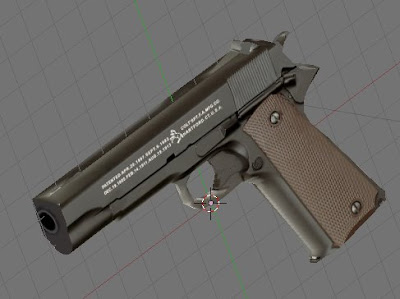


I'm pretty pleased with it overall, especially when I look at it textured like that. Unfortunately, the naked truth reveals that my geometry is ugly and far from optimized. Later I'll have to clean up redundant faces, but the good news is that this won't affect my UV's as a whole.
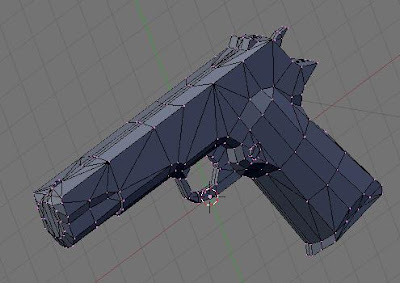
Saturday, January 26, 2008

SKS Update

The new stock and magazines are perfect. Everything fit and fired just as it should have and it was very comfortable to shoot. I couldn't be happier with the performance, and perhaps the sweetest aspect of it all is that the whole thing only cost around $300.

Thursday, January 17, 2008

New hard drive

Newegg had some cheap 250gb sata hard disks, so I picked one up to replace my 80gb pata disk. The old 80gb drive housed my Windows XP partition, mainly because my install disk couldn't recognize my other sata disk and I didn't have a driver floppy to feed it.
I'm not the sort that re-installs Windows every six months, or whatever other relatively frequent interval those so-called technical sorts nuke, so I proceeded to find out how I could clone it.

I'm going to chase this rabbit for just a moment.
Why do so many 'high-proficiency' PC users re-install Windows at frequent intervals? When I installed Windows XP, I'd been running Windows98 for more than four years. This install of XP is almost past its third birthday and it still runs like a champ. I'll grant that I've had to manually defragment once (this isn't as complex as it might sound, just moving files from disk to disk really), but minute for minute, it's easier and faster than re-installing. The most common excuse I hear for re-installing is, "Oh I just do so much, the thing gets bogged down." I try nearly every new game or open source project I find, not to mention I have development software and libraries for a dozen languages and I never seem to have this necessity. I don't fancy that I do anything special to keep things running either, if anything my PC and both its resident OS' could file domestic battery claims based on my rigorous computing habits, but alas, I digress.

A quick search revealed a nice package of Linux tools for dealing with NTFS and the specific process I was looking for was reasonably well documented at
http://alma.ch/blogs/bahut/2005/04/cloning-xp-with-linux-and-ntfsclone.html

I'm pleased to see how far NTFS support has come in Linux. Don't forget that this crap has to be reverse engineered since some people apparently never learned how to play nice as children.
For those using Ubuntu or it's relatives, you can likely fetch these tools with 'apt-get install ntfsprogs'.

Oh yeah, First Post!